SQL : Finding rows that have changed in Table with CHECKSUM, BINARY_CHECKSUM, HASHBYTES

CHECKSUM function returns the checksum value computed over a table row, or over an expression list.

BINARY_CHECKSUM returns the binary checksum value computed over a row of a table or over a list of expressions.

HASHBYTES returns the MD2, MD4, MD5, SHA, SHA1, or SHA2 hash of its input in SQL Server.For SQL Server 2014 (12.x) and earlier, allowed input values are limited to 8000 bytes. Beginning with SQL Server 2016 (13.x), all algorithms other than SHA2_256, and SHA2_512 are deprecated.

BINARY_CHECKSUM and CHECKSUM return different values for the string data types, where locale can cause strings with different representation to compare as equal. 

However, CHECKSUM and BINARY_CHECKSUM  cannot is not guaranteed the values in the expression list is changed. It’s better to use HASHBYTES instead. 

Examples

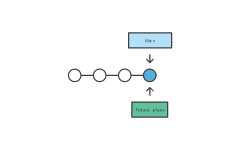
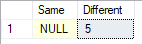
If we have an incoming row of data (let’s say @column1, @column2, @column3, @column4) and I want to know if the incoming values match the ones already in the table and update the table only if they are different, what’s the best way to do that/

You might think that’s easy and you’d just add a WHERE clause to your UPDATE like:

Where Column1 = @column1
and Column2 = @column2
and Column3 = @column3
and Column4 = @column4

If you have large number of columns then you can imagine what this looks like. In addition, you may need to handle the the NULL value if column are nullable like this:

( ISNULL(Column1,'') = ISNULL(@column1,'')

The easier way to do this is by adding one more column that represents a checksum or hash value for all the columns then just compare that one field. The remain question is about which checksum or hashing function to use. Based on the information I mentioned in the above, the checksum and binary_checsum cannot guarantee the result is correct. Therefore hashbytes is the better options to do this job.

HASHBYTES('SHA2_256',
CONCAT(@column1, '|',
@column2, '|',
@column3, '|',
@column4,'|' ))

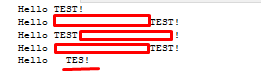
Tips: add a separator ‘|’ character between columns to allow for empty strings

SQL Server : IDENT_CURRENT,@@IDENTITY, and SCOPE_IDENTITY

SCOPE_IDENTITY, IDENT_CURRENT, and @@IDENTITY are similar functions because they return values that are inserted into identity columns. However, the scope and session on which last is defined in each of these functions differ:

  • IDENT_CURRENT is not limited by scope and session; it is limited to a specified table. It returns the last identity value generated for a specific table in any session and any scope.
  • @@IDENTITY returns the last identity value generated for any table in the current session, across all scopes.
  • SCOPE_IDENTITY returns the last identity value generated for any table in the current session and the current scope.

Failed statements and transactions can change the current identity for a table and create gaps in the identity column values. The identity value is never rolled back even though the transaction that tried to insert the value into the table is not committed. For example, if an INSERT statement fails because of an IGNORE_DUP_KEY violation, the current identity value for the table is still incremented.

Examples

The following example shows the different identity values that are returned by IDENT_CURRENT@@IDENTITY, and SCOPE_IDENTITY

USE test;
GO
IF OBJECT_ID(N’t6′, N’U’) IS NOT NULL
DROP TABLE t6;
GO
IF OBJECT_ID(N’t7′, N’U’) IS NOT NULL
DROP TABLE t7;
GO
CREATE TABLE t6(id INT IDENTITY);
CREATE TABLE t7(id INT IDENTITY(100,1));
GO
CREATE TRIGGER t6ins ON t6 FOR INSERT
AS
BEGIN
INSERT t7 DEFAULT VALUES
END;
GO
–End of trigger definition

SELECT id FROM t6;
–IDs empty.

SELECT id FROM t7;
–ID is empty.

–Do the following in Session 1
INSERT t6 DEFAULT VALUES;
SELECT @@IDENTITY;
/*Returns the value 100. This was inserted by the trigger.*/

SELECT SCOPE_IDENTITY();
/* Returns the value 1. This was inserted by the
INSERT statement two statements before this query.*/

SELECT IDENT_CURRENT(‘t7’);
/* Returns value inserted into t7, that is in the trigger.*/

SELECT IDENT_CURRENT(‘t6’);
/* Returns value inserted into t6. This was the INSERT statement four statements before this query.*/

— Do the following in Session 2.
SELECT @@IDENTITY;
/* Returns NULL because there has been no INSERT action up to this point in this session.*/

SELECT SCOPE_IDENTITY();
/* Returns NULL because there has been no INSERT action up to this point in this scope in this session.*/

SELECT IDENT_CURRENT(‘t7’);
/* Returns the last value inserted into t7.*/

Working with existing Git Repository

When you join to a new team or new project, they may have a existing Git repository already. For start working, instead of set up Git repository from the scratch, you just need to copy the remote repository to local and create a new branch for yourself work. Git refers the copying a repository as ‘cloning’. When you clone a repository, you create a connection between the remote git server (we are using Gitlab in this article) and you local system.

Step 1. Clone your repository to your local system

  1. Navigate to your local repository directory
    cd "your local repo folder"
  2. From the Gitlab website, go to current repository page and go the clone address by click the ‘Clone’ button’
  3. clone report to local
    git clone "remote repo address"
  4. Configure your Git username/email
    git config --global user.name "FIRST_NAME LAST_NAME"
    git config --global user.email "[email protected]"

Create a branch where you can add/change the code that you aren’t ready to commit. When you are ready to release those changes to all, you can merge the changes into your main repository and then delete the no-longer-needed branch.

Step 2. Create a branch

It’s important to understand that branches are just pointers to commits. When you create a branch, all Git needs to do is create a new pointer—it doesn’t create a whole new set of files or folders. Before you begin, your repository looks like this:

git branch future-plans 

This command creates a branch but does not switch you to that branch, so your repository looks something like this:

The repository history remains unchanged. All you get is a new pointer to the current branch. To begin working on the new branch, you have to check out the branch you want to use.

Step 2. Checkout branch

git checkout future-plans

Now that you’ve checked out the new branch, your Git workflow looks something like this:

Step 3. Change and save your code

once you saved your changes, you can check the branch status by run

git status 

Step 4. Stage your file

Step 5. Commit your change

git commit -m "commit messages"

Step 3. Upload local repository to remote repository

The git push command is used to upload local repository content to a remote repository. Pushing is how you transfer commits from your local repository to a remote repo.

git push

Step 3. Create merge request

The git merge command lets you take the independent branch which created by git branch (at step 3)and integrate them into the main branch. But as you working in a team, normally you cannot merge your branch to other branch directly, you need to submit a merge request to do this.

ISNULL, NULLIF, and COALESCE

The ISNULL function and the COALESCE expression have a similar purpose but ISNULL can have two parameters only, COALESCE can have multiple input.

Both are checking the parameters in order and returns the current value of the first expression that initially doesn’t evaluate to NULL.

SELECT ISNULL(hourly_wage * 40 * 52, salary) AS income
FROM dbo.wages

SELECT COALESCE(hourly_wage * 40 * 52, salary, commission) AS income
FROM dbo.wages

The NULLIF function returns a NULL value if the two parameters are equal. for instance, we could use NULLIF if we wanted to return NULLs whenever the field equal giving value:

SELECT NULLIF(4,4) AS Same, NULLIF(5,7) AS Different;

SQL Placeholder and Composite Format String

The msg_str argument in RAISERROR (Transact-SQL) described the structure of message string and the use of parameters in the string. It’s very useful if we want to build dynamic text or string with multiple parameters. In this article, we are listed variety of format sample.

Conversion specifications format

% [[flag] [width] [. precision] [{h | l}]] type

flag

Is a code that determines the spacing and justification of the substituted value.

CodePrefix or justificationDescription
– (minus)Left-justifiedLeft-justify the argument value within the given field width.
+ (plus)Sign prefixPreface the argument value with a plus (+) or minus (-) if the value is of a signed type.
0 (zero)Zero paddingPreface the output with zeros until the minimum width is reached. When 0 and the minus sign (-) appear, 0 is ignored.
# (number)0x prefix for hexadecimal type of x or XWhen used with the o, x, or X format, the number sign (#) flag prefaces any nonzero value with 0, 0x, or 0X, respectively. When d, i, or u are prefaced by the number sign (#) flag, the flag is ignored.
‘ ‘ (blank)Space paddingPreface the output value with blank spaces if the value is signed and positive. This is ignored when included with the plus sign (+) flag.

width

Is an integer that defines the minimum width for the field into which the argument value is placed. If the length of the argument value is equal to or longer than width, the value is printed with no padding. If the value is shorter than width, the value is padded to the length specified in width.

An asterisk (*) means that the width is specified by the associated argument in the argument list, which must be an integer value.

precision

Is the maximum number of characters taken from the argument value for string values. For example, if a string has five characters and precision is 3, only the first three characters of the string value are used.

For integer values, precision is the minimum number of digits printed.

An asterisk (*) means that the precision is specified by the associated argument in the argument list, which must be an integer value.

{h | l} type

Is used with character types d, i, o, s, x, X, or u, and creates shortint (h) or longint (l) values.

Type specificationRepresents
d or iSigned integer
oUnsigned octal
sString
uUnsigned integer
x or XUnsigned hexadecimal

Examples

string format

SELECT FORMATMESSAGE(‘Hello %s!’, ‘TEST’);
SELECT FORMATMESSAGE(‘Hello %20s!’, ‘TEST’);
SELECT FORMATMESSAGE(‘Hello %-20s!’, ‘TEST’);
SELECT FORMATMESSAGE(‘Hello % 20s!’, ‘TEST’);
SELECT FORMATMESSAGE(‘Hello %5.3s!’, ‘TEST12345678’);

number format

SELECT FORMATMESSAGE(‘Signed int %i, %d %i, %d, %+i, %+d, %+i, %+d’, 5, -5, 50, -50, -11, -11, 11, 11);
SELECT FORMATMESSAGE(‘Signed int with up to 3 leading zeros %03i’, 5);
SELECT FORMATMESSAGE(‘Signed int with up to 20 leading zeros %020i’, 5);
SELECT FORMATMESSAGE(‘Signed int with leading zero 0 %020i’, -55);
SELECT FORMATMESSAGE(‘Bigint %I64d’, 3000000000);
SELECT FORMATMESSAGE(‘Unsigned int %u, %u’, 50, -50);
SELECT FORMATMESSAGE(‘Unsigned octal %o, %o’, 50, -50);
SELECT FORMATMESSAGE(‘Unsigned hexadecimal %x, %X, %X, %X, %x’, 11, 11, -11, 50, -50);
SELECT FORMATMESSAGE(‘Unsigned octal with prefix: %#o, %#o’, 50, -50);
SELECT FORMATMESSAGE(‘Unsigned hexadecimal with prefix: %#x, %#X, %#X, %X, %x’, 11, 11, -11, 50, -50);

How to set up mail notification for SQL Server job failures

When we set up SQL Server Job, its is a very common requirement ‘need to get email notification once Job is failed’. It’s not difficult, just need few clicks in SQL Server Management Studio to implement this requirement.

Overview Steps

  1. Configure Database Mail.
  2. Set up SQL Server Agent Alert System .
  3. Create an Operator.
  4. Set up SQL Server job notifications

Configuring Database Mail

Open SQL Server Management Studio (SSMS), expand Management and right-click on Database Mail and then click Configure Database Mail.

SQL Server Management Studio
Database Mail Configuration Wizard

Select “Set up Database Mail by performing the following tasks” and Click Next.

Click Yes and then click Next if mail hasn’t been configured yet.

Give the New Profile a name and then click Add.

create new profile

Fill in the correct SMTP information as below

click Next

New Profile

Check the option to make the new profile Public. If the profile isn’t set to Public

Manage Profile Security

Review the System Parameters , please keep the default settings if your are not sure how to adjust them. Click Next and Finish the Mail set up.

Configure system parameters

You should see that each Action was completed and has a Status of Success. Click Close.

Configuration Complete Test

Set up SQL Server Agent Alert System

Right-click SQL Server Agent and select Properties.

SQL Server Agent Properties

Click on Alert System

· Under Mail session, select the option to Enable mail profile. Ensure the correct Mail profile is selected.

· Under Token replacement, enable Replace tokens for all job responses to alerts.

Click OK. Restart the SQL Server Agent service.

Create an Operator

Under the SQL Server Agent, right-click Operators and select New Operator…

SQL Server Agent Operator

Type in the recipient email address in the E-mail name and click OK.

Set up SQL Server job notifications

Expand SQL Server Agent and click on Jobs. Find the job you want to change, right click it and select Properties.

Under Select a page, select Notifications. Enable the first option, E-mail. Then select the Operator we just created and change the job to email When the job fails. Click OK.

SSIS Catalog Migrate

Install ‘ SSIS Catalog Migration Wizard ‘ from Visual Studio Marketplace

Once Installation is done, we can find ‘SSIS Cataloger’ under ‘Tools’ menu

Choose Source

Choose Target

Choose SSIS Catalog folders to Migrate

Migration is done

How To Get Day Of Week In SQL Server?

SQL Server has a couple of inbuilt functions to get the day of week from the given date. To get the name of the day of week, you can use DATENAME function and to get the number of the day of week, you can use DATEPART function.

Example

SELECT DATENAME(WEEKDAY, GETDATE())
/* Result */
Monday

SELECT DATEPART(WEEKDAY, GETDATE())
/* Result */
2

By default, SQL server always uses Sunday as the first day of the week. You can use SET DATEFIRST 1 to set Monday as the first day of the week.

SQL SERVER How to deleting big volume of data from very huge table

Issue

We one of very huge database which running out of server disk space. I was asked to remove millions of historical data from some huge table. When I try to run DELETE with where condition directly, I got two problems. Firstly, whole table blocked for long time (long then 12 hours). Secondly, after run DELETE the ldf Database log file increased exponentially and the script ending with error because disk is full.

Solution

Base on the server’s situation, we may using different way to solve this issue.

1. We just want to Deleting All the data from the table then the best option will be Truncate table directly, as below:

TRUNCATE TABLE huge_history_table


This TRUNCATE TABLE command will remove all rows from a table, without logging the individual row deletions. TRUNCATE TABLE is similar to the DELETE statement with no WHERE clause; however, TRUNCATE TABLE is faster and uses fewer system and transaction log resources.

2. We want to deleting more than 80-90 Percent of the data from the huge table and this table can be offline for short period. We can using SELECT INTO script to move the data (data need to keep) to another staging table. Then Truncate this Large table and Insert back the staging data. as below:

SELECT * INTO staging_table
FROM huge_table
WHERE create_date>’DateAdd(month, -1, Convert(datetime, GetDate()))’


TRUNCATE TABLE huge_table


INSERT INTO huge_table (column_name)
SELECT column_name
FROM staging_table

3. One last option I can think of is to change your database’s Recovery Mode to SIMPLE and then delete rows in smaller batches using a while loop something like this. We want to delete large historical data from the table, the table need to be accessed by system 24×7 and cannot find a time take if offline. Then we delete rows in smaller batches using a while loop something as below:

DECLARE @Deleted_Rows INT;
SET @Deleted_Rows = 1;

WHILE (@Deleted_Rows > 0)
BEGIN
— Delete some small number of rows at a time
DELETE TOP (10000) LargeTable
WHERE create_date<‘DateAdd(month, -1, Convert(datetime, GetDate()))’

SET @Deleted_Rows = @@ROWCOUNT;
END

PowerShell : How to replace string in files

Issue

How can we replace text in multiple files and folders quickly if folder name and file name are dynamically change.

Solution

Using PowerShell built-in cmdlets we can easily read and replace any kind of content inside of a text file.

First, we can using Get-ChildItem to get all the files. Because the folder name and file name are dynamical then need to use wildcard in the path as below:

$files = Get-ChildItem ‘D:\test\*\files**.txt’ -Recurse

Then we need to loop the $files to get then content for each file and replace.

$files | %{
(gc $_ -Encoding UTF8) -replace ‘test’,” | Set-Content $_.fullname -Encoding UTF8
}