
When you join to a new team or new project, they may have a existing Git repository already. For start working, instead of set up Git repository from the scratch, you just need to copy the remote repository to local and create a new branch for yourself work. Git refers the copying a repository as ‘cloning’. When you clone a repository, you create a connection between the remote git server (we are using Gitlab in this article) and you local system.
Step 1. Clone your repository to your local system
- Navigate to your local repository directory
cd "your local repo folder" - From the Gitlab website, go to current repository page and go the clone address by click the ‘Clone’ button’
- clone report to local
git clone "remote repo address" - Configure your Git username/email
git config --global user.name "FIRST_NAME LAST_NAME"git config --global user.email "[email protected]"
Create a branch where you can add/change the code that you aren’t ready to commit. When you are ready to release those changes to all, you can merge the changes into your main repository and then delete the no-longer-needed branch.
Step 2. Create a branch
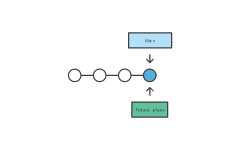
It’s important to understand that branches are just pointers to commits. When you create a branch, all Git needs to do is create a new pointer—it doesn’t create a whole new set of files or folders. Before you begin, your repository looks like this:

git branch future-plans
This command creates a branch but does not switch you to that branch, so your repository looks something like this:
The repository history remains unchanged. All you get is a new pointer to the current branch. To begin working on the new branch, you have to check out the branch you want to use.
Step 2. Checkout branch
git checkout future-plans
Now that you’ve checked out the new branch, your Git workflow looks something like this:

Step 3. Change and save your code
once you saved your changes, you can check the branch status by run
git status
Step 4. Stage your file
Step 5. Commit your change
git commit -m "commit messages"
Step 3. Upload local repository to remote repository
The git push command is used to upload local repository content to a remote repository. Pushing is how you transfer commits from your local repository to a remote repo.
git push
Step 3. Create merge request
The git merge command lets you take the independent branch which created by git branch (at step 3)and integrate them into the main branch. But as you working in a team, normally you cannot merge your branch to other branch directly, you need to submit a merge request to do this.