.Net Core Connection String

In ASP.NET Core the configuration system is very flexible, and the connection string could be stored in appsettings.json. In this blog, this blog shows asp.net core how to use the connection string stored in appsettings.json.

Config appsettings.json file

To define the connection strings in appsettings.json it is important to specify it in the right section of the JSON structure. Below snippet shows how to store connection string in appsettings.json file

{
“Logging”: {
“LogLevel”: {
“Default”: “Warning”
}
},
“AllowedHosts”: “*”,
“ConnectionStrings”: {
“Dev”: “Server=myServer;Database=dev;Trusted_Connection=True;”,
“Live”: “Server=myServer;Database=live;Trusted_Connection=True;”
}
}

Read connection string from appsettings.json file

For Entity Framework Core, we can use the Configuration API to pass the connection string to the DbContext in the Startup class:

public void ConfigureServices(IServiceCollection services) {
if (CurrentEnvironment.IsDevelopment())
{
services.AddDbContext(options => { options.UseSqlServer(Configuration.GetConnectionString(“Dev”)); });
}
else {
services.AddDbContext(options => { options.UseSqlServer(Configuration.GetConnectionString(“Live”)); });
}
}

Not Entity Framework

If you are not an Entity Framework Core fan, then you can create a interface with property to store the connection string.

public interface IDBInfo
{
string DbConnectionString { get; }
}

In the Startup class we can use AddScoped method to read data from json file to interface:

public void ConfigureServices(IServiceCollection services) {
if (CurrentEnvironment.IsDevelopment())
{
services.AddScoped(x => new DBInfo(Configuration.GetConnectionString(“Dev”)));
}
else {
services.AddScoped(x => new DBInfo(Configuration.GetConnectionString(“live”)));
}
}

.NET Core with Dapper

When you searching .NET Core database via Google, all results in the first five page are EF Core. But I am a Dapper fans, I thought I should introduce about .NET Core and Dapper.

Add Connection String to appsettings.json

.Net Core can use appsettings.json to store database connection string. Open the file and add a ConnectionString section to the file. You can maintain multiple connection strings in this section if you have more than one connection string.

“ConnectionStrings”: {
“Dev”: “Server=WIN-TAUP5KNN93J\SQLEXPRESS;Database=test;User Id=sa;Password=sa;”,
“Test”: “Server=WIN-TAUP5KNN93J\SQLEXPRESS;Database=live;User Id=sa;Password=sa;”
}

Create generic interface and class to pass the connection string between service

Because the heart of .NET Core is DI. we are going to use DI to pass the connection strings between different classes and services.

public interface IDBInfo
{
string GetConnectionString();
}
public class DBInfo : IDBInfo
{
private string _dbString;
public DBInfo(string connString)
{
_dbString = connString;
}
public string GetConnectionString()
{
return _dbString;
}
}

DI passing connection string to DBinfo class

Using below code to get connection string from setting file and pass to DBInfo class.

services.AddTransient(x=> new DBInfo(Configuration.GetConnectionString(“Dev”)));

Add Nuget Package

Open you database access project and add below two Nuget packages:

Install System.Data.SqlClient for using SqlConnection

Install Dapper

Using Dapper

To make things simple, I am only show Dapper related code at below. Dapper has number of extension methods. For detail Dapper API, you can get from Dapper Gehub project page. In below code shows how to pass connection string from contractor to service and fetch the data from table.

public class UserService : IUserService
{
#region Fields
private readonly IDBInfo _db;
#endregion
public UserService(IDBInfo dbInfo) {
_db = dbInfo;
}
public List GetUserList()
{
using (var con = new SqlConnection(_db.GetConnectionString()))
{
var users = con.Query(
“SELECT [User_Id],[PC_Name],[PC_IP],[First_Name],[Last_Name],[Password],[Is_Manager] FROM [tb_users]”
)
.ToList();
return users;
}
}
}

SQL SERVER : Login Failed. The Login is From an Untrusted Domain and Cannot be Used with Windows Authentication

Recently, I try to setup a new SQL SERVER on AWS. When I try to connect to server via private IP. I got below SQL Login error:

Login failed. The login is from an untrusted domain and cannot be used with Integrated authentication. [CLIENT: 172.31.23.96]
SSPI handshake failed with error code 0x8009030c, state 14 while establishing a connection with integrated security; the connection has been closed. Reason: AcceptSecurityContext failed. The operating system error code indicates the cause of failure. The logon attempt failed [CLIENT: 172.31.23.96]

WORKAROUND/SOLUTION

Loopback check can be removed by adding a registry entry as follows:

  • Edit the registry using regedit. (Start –> Run > Regedit )
  • Navigate to: HKLM\System\CurrentControlSet\Control\LSA
  • Add a DWORD value called “DisableLoopbackCheck”
  • Set this value to 1

Refer : https://blogs.msdn.microsoft.com/dataaccesstechnologies/2012/12/19/error-message-login-failed-the-login-is-from-an-untrusted-domain-and-cannot-be-used-with-windows-authentication/

SSIS : Use SSIS Environment variable to maintain multiple server connection string

In the real project, we need to maintain lots of environments for different purpose, like testing server, staging server and production server . How can we deploy SSIS project to different server and run directly without any code change.

I am going to use DB Connection string as an example in this blog to show you how can we connect to different database without code change after project deployed.

  1. Add new Connection Managers
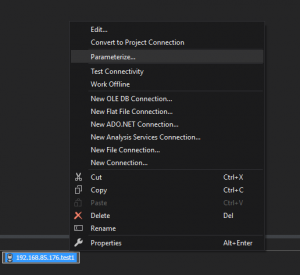
  2. Right click the new created connection manager then select ‘Parameterize…’ from popup list

3. change property to ‘ConnectionString’, select ‘Create new parameter’ in Parameterize window and enter the parameter name

4. Once you saved this configuration then you can see your saved parameter in Project Parameters windows

5. In Management Studio, expand the Integration Services Catalogs> SSISDB node in Object Explorer, and locate the Environments folder of the project for which you want to create an environment. Type a name for the environment and optionally a description, and then click OK.

6. Right-click the new environment and then click Properties to open properties window.

7. On the Variables page, do the following to add a variable:
Enter the variable name
Select the Type for the variable.
Enter the Value for the variable

8. Click OK to save your changes to the environment properties.

9. Under the SSISDB node in Object Explorer, expand the Projects folder, right-click the project, and then click Configure.

10. On the References page, click Add to add an environment, and then click OK to save the reference to the environment.

11. Right-click the project again, and then click Configure. In the Parameters tab on the Parameters page, click the browse button next to the Value field. Click Use environment variable, and then select the environment variable you created.

12. Click OK twice to save your changes.

SSIS: Foreach Loop Container

The Foreach Loop container defines a repeating control flow in a package. It is similar to Foreach looping in programming languages. In a package, looping is enabled by using a Foreach enumerator. The Foreach Loop container repeats the control flow for each member of a specified enumerator.

This procedure describes how to configure a Foreach Loop container, including property expressions at the enumerator and container levels.

  1. In SQL Server Data Tools (SSDT), open the Integration Services project that contains the package you want.
  2. Click the Control Flow tab and double-click the Foreach Loop.
  3. In the Foreach Loop Editor dialog box, click General and, optionally, modify the name and description of the Foreach Loop.
  4. Click Collection and select an enumerator type from the Enumerator list.
  5. Specify an enumerator and set enumerator options
  6. Optionally, click the browse button (…) in the Expressions text box on the Collection page to create expressions that update property values. 
  7. Optionally, click Variable Mappings to map object properties to the collection value, and then do the following things:
    a. In the Variables list, select a variable or click <New Variable> to create a new variable.
    b. If you add a new variable, set the variable properties in the Add Variable dialog box and click OK.
    c. If you use the For Each Item enumerator, you can update the index value in the Index list. Note, The index value indicates which column in the item to map to the variable. Only the For Each Item enumerator can use an index value other than 0.

SSIS: How to debug Foreach Loop Container Variable

In today’s blog post, I am going to show you how to debug ForEach Loop Container variable.

Let’s say you fetched a data list from table and want to loop this list to do other tasks item by item. But you want to debug the item value before run other task.

First, Create two variables for Foreach Loop Container:

In the control flow of an SSIS package, add an Execute SQL Task and open the editor. Set the ‘Result Set‘ property to Full result set. Create an OLE DB connection to the database. Add the following T-SQL statement:

SELECT URL as BookListURL,Id as BookCategoryId,PreviousProcessedPageNumber as BookPreviousProcessedPageNumber
FROM URL_BookList

Click the ‘Result Set‘ option to the left. Set the Result Name to 0 and for the Variable Name, select User::BookListURLs. This variable will hold the results returned by the query. Click OK to close the editor.

Next,  add a ForEach Loop container and connect the Execute SQL  task to it. Open the editor and click Collection. In the enumerator drop down menu, select ForEach ADO Enumerator. In the ADO Object Source Variable drop down menu, select BookListURLs and for the Enumeration Mode, select Rows in the first table.

Set up Variable Mappings then click OK to close the editor:

To debug looping item value, you need to add a Breakpoint:

Now, execute the package. The package will stop and a watch window should open at the bottom of the screen. If it doesn’t, click Debug > Windows > Watch 1. In the watch window, add the names of the variables you want to monitor. Keep in mind that the variable names are case sensitive here.

Powershell script sending email (Gmail)

I have a simple powershell project to do file copy and sync task. Can I get email notification if task has issue, like error message or copied file name. The answer is yes, we can us Net.Mail.SmtpClient to send out email in powershell.

Below is the script:

function status_notification{
param( [string]$body,[string] $subject ,[string] $emailTo)
$email =”[email protected]
$psCred = New-Object System.Net.NetworkCredential(“$email”, ” your email password “);
$smtpServer = “smtp.gmail.com”
$msg = new-object Net.Mail.MailMessage
$smtp = new-object Net.Mail.SmtpClient($smtpServer,587)
$smtp.EnableSsl = $true
$msg.IsBodyHTML = $true
$msg.From = “$email”
$msg.To.Add(“$ emailTo”)
$msg.Subject = “$subject”
$msg.Body = “$body”
$smtp.Credentials = $psCred
$smtp.Send($msg)
}

SQL Server Date and Time styles

One of the most frequently question I asked is which date format style number I should to use. Here’s a summary of different date and time style matrix that we can used in T-SQL as part of the CONVERT function.

Matrix of Date and Time style

Style numberInput/Output Format
100 mon dd yyyy hh:miAM (or PM)
1011 = mm/dd/yy
101 = mm/dd/yyyy
1022 = yy.mm.dd
102 = yyyy.mm.dd
1033 = dd/mm/yy
103 = dd/mm/yyyy
1044 = dd.mm.yy
104 = dd.mm.yyyy
1055 = dd-mm-yy
105 = dd-mm-yyyy
1066 = dd mon yy
106 = dd mon yyyy
1077 = Mon dd, yy
107 = Mon dd, yyyy
108hh:mi:ss
109 mon dd yyyy hh:mi:ss:mmmAM (or PM)
11010 = mm-dd-yy
110 = mm-dd-yyyy
11111 = yy/mm/dd
111 = yyyy/mm/dd
11212 = yymmdd
112 = yyyymmdd
113 dd mon yyyy hh:mi:ss:mmm (24h)
114hh:mi:ss:mmm (24h)
 120 yyyy-mm-dd hh:mi:ss (24h)
 121 yyyy-mm-dd hh:mi:ss.mmm (24h)
22 mm/dd/yy hh:mi:ss AM (or PM)
23yyyy-mm-dd
126yyyy-mm-ddThh:mi:ss.mmm (no spaces)
127yyyy-mm-ddThh:mi:ss.mmmZ (no spaces)
130dd mon yyyy hh:mi:ss:mmmAM
131dd/mm/yyyy hh:mi:ss:mmmAM

Sample convert string to datetime

select convert(datetime, ‘2015/12/31 13:58:03’,111)

select convert(datetime, ‘2012-11-07T18:26:20.096Z’,127)

How to compare SQL Server Table schemas

We can use sp_help to display all table schema

sp_help import_OAN_clients

Will get below result:

But how we can compare two tables schema quickly via T-SQL? We can use INFORMATION_SCHEMA.COLUMNS to compare two tables schema easily, but this way cannot compare table cross database or instance. In this blog I will show how to compare it with internal function sys.dm_exec_describe_first_result_set

Create Demo Tables

CREATE TABLE demo1(
	[User_ID] [nvarchar](50) NULL,
	[FirstName] [nvarchar](50) NULL,
	[LastName] [nvarchar](100) NULL,
	[BirthDate] datetime NULL,
	[Citizenship] [nvarchar](100) NULL,
	[Country] [nvarchar](20) NULL
) 
CREATE TABLE demo2(
	[User_ID] [nvarchar](50) NULL,
	[FirstName] [nvarchar](100) NULL,
	[LastName] [nvarchar](100) NULL,
	[BirthDate] [nvarchar](30) NULL,
	[Citizenship] [nvarchar](100) NULL,
	[Country] [nvarchar](100) NULL
) 

How sys.dm_exec_describe_first_result_set is working

If you want to know all detail specs of sys.dm_exec_describe_first_result_set, you can go to microsoft developer community

before we start compare two tables, let’s see what kind of information the function can get

select * from sys.dm_exec_describe_first_result_set ( N’SELECT * FROM dbo.demo1′, NULL, 1)

We can see the returned schema as below:

Doing Comparisons

To do two tables comparison, we just need to simply doing OUTER JOIN between the two function results. (To do comparisons between to database or instance, please use linked servers and full part name to address the table. like product.dbo.demo2)

select a.column_ordinal,b.column_ordinal,a.name,b.name ,a.is_nullable,b.is_nullable ,a.system_type_name,b.system_type_name,a.max_length,b.max_length,a.precision,b.precision,a.scale,b.scale
from sys.dm_exec_describe_first_result_set ( N’SELECT * FROM dbo.demo1′, NULL, 1) as a
full outer join sys.dm_exec_describe_first_result_set ( N’select * from dbo.demo2′, NULL, 1) as b
on a.name = b.name

We can see the comparison result between to tables now.

SSIS: Execute SSIS Package from a SQL Server Stored Procedure

I have a Integration Services Project:SSIS_UK_Projects contains the package LEI_Lookup.dtsx. But how I can run it from Stored Procedure?

1. calls catalog.create_execution to create an instance of execution for the LEI_Lookup.dtsx package.

EXEC [SSISDB].[catalog].[create_execution]
@package_name=N’LEI_Lookup.dtsx’,
@execution_id=@execution_id OUTPUT,
@folder_name=N’UK’,
@project_name=N’SSIS_UK_Projects’,
@use32bitruntime=False,
@reference_id=@env_reference_id

2 calls catalog.set_execution_parameter_value to set values for the parameter, and LOGGING_LEVEL parameters.

Select @execution_id
EXEC [SSISDB].[catalog].[set_execution_parameter_value] @execution_id, @object_type=50, @parameter_name=N’LOGGING_LEVEL’,@parameter_value=1

EXEC [SSISDB].[catalog].[set_execution_parameter_value] @execution_id, @object_type=30, @parameter_name=N’Client_code’, @parameter_value=@parameter1
EXEC [SSISDB].[catalog].[set_execution_parameter_value] @execution_id, @object_type=30, @parameter_name=N’Source_table’, @parameter_value=N’processing_hold’

3. calls catalog.start_execution to start an instance of execution.

EXEC [SSISDB].[catalog].[start_execution] @execution_id