How to use Git in Visual Studio Code

Before change code in dev branch, you need to ensure you had the latest change of the master branch.

  1. Check your current local branch by using ‘git branch‘.
  2. Use ‘git checkout master‘ to switch your current branch if you are not on the master branch
  3. Use ‘git pull‘ to get latest update from the master remote repository. This command will download the latest changes from the remote repository and merge them with your local master branch.
  4. Use ‘git checkout dev‘ to switch your branch from local master to local dev
  5. Use ‘git merge master‘ to merge the changes from master branch into your local dev branch

Now, local dev branch’s code is updated to the same as master remote repository then you can start your new code change in dev branch.

  1. Before you change start code change, always use ‘git branch‘ to check what’s your current branch. then start your code change
  2. Once you finished your code change, use ‘git status’ to check the status of your local repository. This will show you which files have been modified or added and which files are ready to be committed.
  3. Use ‘git add <file>’ to stage the changes your want to commit. or You can stage all changes by using ‘git add .
  4. Use ‘git commit -m “commit message” ‘ to commit changes with a message describing the changes made.
  5. Use ‘git push‘ to upload your commits to remote repository. this command sends your local commits to remote repository and make them available to others.
  6. a merge request should automatically created after ‘git push’ is done. this merge request will try to merge dev branch changes to master branch.

To checkout a remote branch from Visual Studio Code, you can follow these steps:

  1. Open the Command Palette by pressing Ctrl+Shift+P (Windows, Linux) or Cmd+Shift+P (macOS).
  2. Type Git: Checkout to... and select it from the list.
  3. In the prompt that appears, select origin/<branch-name> from the dropdown list of remote branches.
  4. Choose a local branch to create or overwrite, or leave it blank to create a new branch with the same name as the remote branch.
  5. Press Enter to complete the checkout.

Working with existing Git Repository

When you join to a new team or new project, they may have a existing Git repository already. For start working, instead of set up Git repository from the scratch, you just need to copy the remote repository to local and create a new branch for yourself work. Git refers the copying a repository as ‘cloning’. When you clone a repository, you create a connection between the remote git server (we are using Gitlab in this article) and you local system.

Step 1. Clone your repository to your local system

  1. Navigate to your local repository directory
    cd "your local repo folder"
  2. From the Gitlab website, go to current repository page and go the clone address by click the ‘Clone’ button’
  3. clone report to local
    git clone "remote repo address"
  4. Configure your Git username/email
    git config --global user.name "FIRST_NAME LAST_NAME"
    git config --global user.email "[email protected]"

Create a branch where you can add/change the code that you aren’t ready to commit. When you are ready to release those changes to all, you can merge the changes into your main repository and then delete the no-longer-needed branch.

Step 2. Create a branch

It’s important to understand that branches are just pointers to commits. When you create a branch, all Git needs to do is create a new pointer—it doesn’t create a whole new set of files or folders. Before you begin, your repository looks like this:

git branch future-plans 

This command creates a branch but does not switch you to that branch, so your repository looks something like this:

The repository history remains unchanged. All you get is a new pointer to the current branch. To begin working on the new branch, you have to check out the branch you want to use.

Step 2. Checkout branch

git checkout future-plans

Now that you’ve checked out the new branch, your Git workflow looks something like this:

Step 3. Change and save your code

once you saved your changes, you can check the branch status by run

git status 

Step 4. Stage your file

Step 5. Commit your change

git commit -m "commit messages"

Step 3. Upload local repository to remote repository

The git push command is used to upload local repository content to a remote repository. Pushing is how you transfer commits from your local repository to a remote repo.

git push

Step 3. Create merge request

The git merge command lets you take the independent branch which created by git branch (at step 3)and integrate them into the main branch. But as you working in a team, normally you cannot merge your branch to other branch directly, you need to submit a merge request to do this.

SQL SERVER How to deleting big volume of data from very huge table

Issue

We one of very huge database which running out of server disk space. I was asked to remove millions of historical data from some huge table. When I try to run DELETE with where condition directly, I got two problems. Firstly, whole table blocked for long time (long then 12 hours). Secondly, after run DELETE the ldf Database log file increased exponentially and the script ending with error because disk is full.

Solution

Base on the server’s situation, we may using different way to solve this issue.

1. We just want to Deleting All the data from the table then the best option will be Truncate table directly, as below:

TRUNCATE TABLE huge_history_table


This TRUNCATE TABLE command will remove all rows from a table, without logging the individual row deletions. TRUNCATE TABLE is similar to the DELETE statement with no WHERE clause; however, TRUNCATE TABLE is faster and uses fewer system and transaction log resources.

2. We want to deleting more than 80-90 Percent of the data from the huge table and this table can be offline for short period. We can using SELECT INTO script to move the data (data need to keep) to another staging table. Then Truncate this Large table and Insert back the staging data. as below:

SELECT * INTO staging_table
FROM huge_table
WHERE create_date>’DateAdd(month, -1, Convert(datetime, GetDate()))’


TRUNCATE TABLE huge_table


INSERT INTO huge_table (column_name)
SELECT column_name
FROM staging_table

3. One last option I can think of is to change your database’s Recovery Mode to SIMPLE and then delete rows in smaller batches using a while loop something like this. We want to delete large historical data from the table, the table need to be accessed by system 24×7 and cannot find a time take if offline. Then we delete rows in smaller batches using a while loop something as below:

DECLARE @Deleted_Rows INT;
SET @Deleted_Rows = 1;

WHILE (@Deleted_Rows > 0)
BEGIN
— Delete some small number of rows at a time
DELETE TOP (10000) LargeTable
WHERE create_date<‘DateAdd(month, -1, Convert(datetime, GetDate()))’

SET @Deleted_Rows = @@ROWCOUNT;
END

RDP unable to connect Azure server

This week I have been having trouble connecting to my Azure server via RDP. I keep getting below errors:

-The number of connections to this computer is limited and all connections are in use right now.

I can connect to server if I changed inbound security rule to allowed my IP address only. But I cannot use white IP list inbound rule as I don’t have static IP.

Then I did some deep investigation and try to tracking failed logon information from system event.

I checked Event Viewer -> Windows Logs -> Security there are lots of Audit Failure event looks like below:

But as you see, it is completely useless. I only can guess their are some attackers tried to logon with a username of Administrator and the Logon Type is set to 3 (generic network logon), and there is no Source Network Address recorded.

But in Event Viewer -> Applications and Services Logs -> Microsoft -> Windows -> RemoteDesktopServices-RDPCoreTS I found lots of below warnings:

In Windows Server 2012 and later version, if an attacker attempts to logon but fails to do so AND uses a username that DOES NOT EXIST on the targeted RDS host or domain that the host is a member of, Event ID 140 is logged, showing you the source IP of the attacker.

I added this IP to Azure blocked IP list then issue is fixed.

IIS Granting folder permissions to Website

Whenever a new website created, IIS will create an application pool that has the same name as website. For example, if you create an website with the name “fictionlib,” an application pool with the name ” fictionlib ” is created. Each application pool has a spcial a security identifier in Windows, system files and folders can be secured by using this identity. However, the identity is not a real user account and will not show up as a user in the Windows User Management Console.

To config, website folder permission, you need to follow below steps:

  1. Open Windows Explorer
  2. Select Website folder
  3. Right click the directory and select Properties
  4. Select the Security tab
  5. Click the Edit button and then Add button
  6. Click the Locations button and make sure that you select your computer.
  7. Enter IIS AppPool\ (eg: IIS AppPool\website name) in the Enter the object names to select: text box
  8. Click the Check Names button and click OK.
  9. Check Modify under the Allow column, and click OK, and OK.

How to install an SSL certificate on Microsoft IIS 10

Before install the SSL certificate, you need to know which kind of certificate you have.

If you certificate file is .cer file then just simply install it via IIS manager. But if have .key file and .crt file then you need to convert the certificate to .pfx file.

Installing certificate via IIS manager

  • go to the Start menu, choose Administrative Tools and select Internet Information Services (IIS) Manager. Otherwise, access it via Win+R >> inetmgr >> OK.
  • Click on the required server name and go to the Server Certificates option in the center menu.

Press the Complete Certificate Request button in the Actions right-side section.

Following the wizard to finish the import step by step. Once imported certificate is shown in the list of Server Certificates. Then you can assign the certificate to the website.

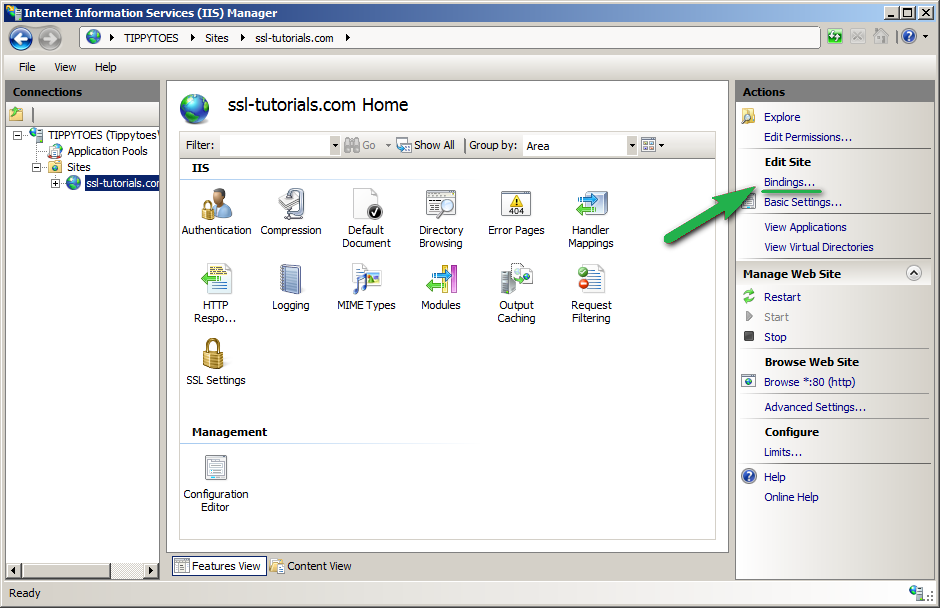
  • pand the Sites menu and choose the website you want to assign the certificate to. After that, click on the Bindings option in the Actions section.
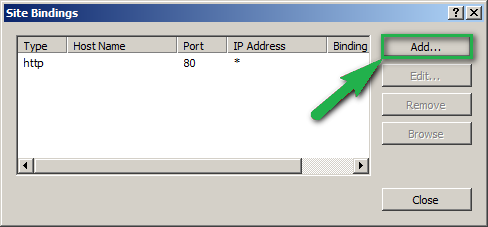
  • In the Site Bindings window, click Add.
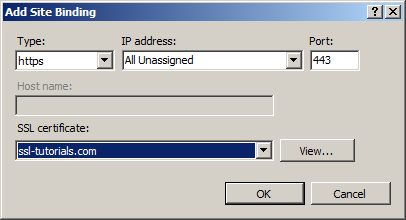
  • In the Add Site Binding window, choose the following parameters:

Type – https;

IP address – All Unassigned, or your IP address;

Port – 443;

SSL certificate – friendly name of the imported certificate.

After all details are selected, click OK button.

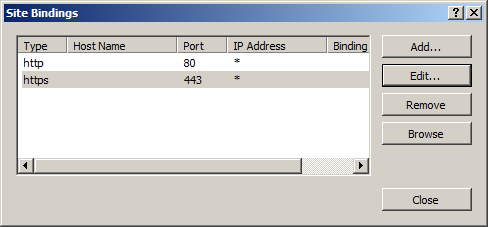
  • The new binding has been successfully created.

If the site already has https enabled, and if you want to update the SSL certificate, you will need to choose the Edit button in binding for port 443, select a friendly name for the new certificate from the dropdown list and click OK to apply the changes.


Converting to PFX file

If you have the private key in PEM format (.key file), you need to generate the certificate in PKCS#12 format (.pfx).

Use this tool to generate the certificate in PKCS#12. Use your certificate with .crt extension, CA bundle with .ca-bundle extension and the saved key with .key extension.

If there’s an OpenSSL client installed on the server, you can create PFX file out of a certificate in PEM format (.pem, .crt, .cer) or PKCS#7/P7B format (.p7b, .p7c) and the private key using the following commands.

PEM (.pem, .crt, .cer) to PFX

openssl pkcs12 -export -out certificate.pfx -inkey privatekey.key -in certificate.crt -certfile more.crt

*where “more.crt” is the name of the CA Bundle file

How to Setup WordPress Custom Permalinks on Windows IIS

This blog will show how to config WordPress Custom URL Structure under Windows and IIS is how to handle URL Rewrites

Log in to the Admin section of your WordPress

Click on Settings -> Permalinks

Choose URL structure or enter a custom structure

Save below web.config file into WordPress root folder can allow permalinks (or “pretty URLs”) on Windows IIS.

<?xml version="1.0" encoding="UTF-8"?>

<configuration>
  <system.webServer>
    <rewrite>
      <rules>
        <rule name="wordpress" stopProcessing="true">
          <match url="." />
        <conditions>
            <add input="{REQUEST_FILENAME}" matchType="IsFile" negate="true"/>
            <add input="{REQUEST_FILENAME}" matchType="IsDirectory" negate="true"/>
        </conditions>
        <action type="Rewrite" url="/index.php"/>
        </rule>
      </rules>
    </rewrite>
  </system.webServer>
</configuration>

Once web.config file created, ‘Pretty URL’ will working properly, but if you have images or other kind of static files in the website, you need to add another rewrite rule to stop above rewrite:


<rule name="Redirect Image to HTTP" stopProcessing="true">
<match url=".*\.(gif|jpg|jpeg|png|css|js)$" ignoreCase="true"/>
<action type="Rewrite" url="{R:0}"/>
</rule>