The LAG() function in SQL Server is used to access data from a previous row within the same result set. It provides a way to look back at the previous row’s value and compare it with the current row’s value. Compare with Lead function, The LEAD function is used to retrieve the value from the next row in a query result set.
Syntax
LAG (scalar_expression [,offset] [,default_value])
OVER ([PARTITION BY partition_expression, ... ]
ORDER BY order_expression [ASC | DESC], ... )
scalar_expression: The expression to be returned from the previous row.
offset: An optional argument that specifies the number of rows to move back from the current row. The default value is 1.
default_value: An optional argument that specifies a default value to return if the offset is beyond the first row.
Example 1
SELECT ProductName, Sales,
  LAG(Sales) OVER (ORDER BY Sales) AS PrevSales
FROM SalesTable
In this example, the query returns the ProductName, Sales, and the previous row’s Sales value. The LAG() function is used to access the previous row’s value and compare it with the current row’s value. The result set is ordered by Sales.
Example 2
SELECT EmployeeName, Salary,
  LAG(Salary, 2, 0) OVER (ORDER BY Salary) AS Prev2ndSalary
FROM EmployeeTable
In this example, the query returns the EmployeeName, Salary, and the second previous row’s Salary value. The LAG() function is used to access the second previous row’s value and compare it with the current row’s value. The result set is ordered by Salary, and the offset argument is set to 2, which specifies that the function should move two rows back from the current row. The default_value argument is set to 0, which specifies a default value to return if the offset is beyond the first row.
Lead function is available from SQL Server 2012. Lead function can accesses data from a subsequent row in the same result set without self-join. Use this function in a Select statement can compare values in the current row with values in the following row.
Syntax
LEAD ( scalar_expression [ ,offset ] , [ default ] )
    OVER ( [ partition_by_clause ] order_by_clause )
scalar_expression the value to be compared and returned between the select result set
offset the number of rows forward from the current, the lead function will fetch the value based on this number.
default the default value returned from the lead function when reached last row of the select result set.
OVER ( [ partition_by_clause ] order_by_clause ) used to divide the result rows by partition_by_clause then order the result set by order_by_clause, the number of offset will be calculated based on the order_by result sets.
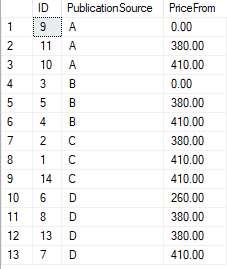
Demo data used in the following Example:
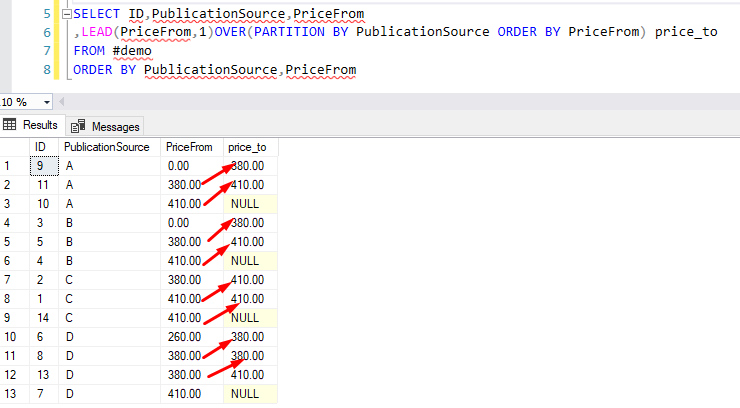
Example 1 Lead function with offset 1 and without a default value
In this example, we will calculate the price_to value for each records, the records will be grouped by PublicationSource and ordered by price_from. the first row’s price_to will be second rows price_from. before SQL Server 2012, we need to use self-join to do this logic. but since SQL Server 2012 , the new function LEAD can do this job as well.
SELECT ID,PublicationSource,PriceFrom
,LEAD(PriceFrom,1)OVER(PARTITION BY PublicationSource ORDER BY PriceFrom) price_to
FROM #demo
ORDER BY PublicationSource,PriceFrom
From the above output, we can see that the Lead function gets the value from the next row of the select result set and return NULL if no subsequent row is available be cause the offset is 1 and default value haven’t provide in the code.
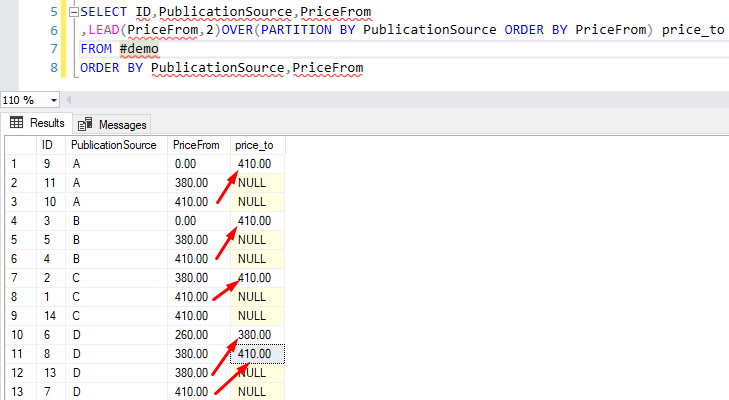
Example 1 Lead function with offset 2 and without a default value
SELECT ID,PublicationSource,PriceFrom ,LEAD(PriceFrom,2)OVER(PARTITION BY PublicationSource ORDER BY PriceFrom) price_to FROM #demo ORDER BY PublicationSource,PriceFrom
From the above output, we can see that the Lead function gets the value from the second row of current data in the select result set and return NULL if no subsequent row is available
Before change code in dev branch, you need to ensure you had the latest change of the master branch.
Check your current local branch by using ‘git branch‘.
Use ‘git checkout master‘ to switch your current branch if you are not on the master branch
Use ‘git pull‘ to get latest update from the master remote repository. This command will download the latest changes from the remote repository and merge them with your local master branch.
Use ‘git checkout dev‘ to switch your branch from local master to local dev
Use ‘git merge master‘ to merge the changes from master branch into your local dev branch
Now, local dev branch’s code is updated to the same as master remote repository then you can start your new code change in dev branch.
Before you change start code change, always use ‘git branch‘ to check what’s your current branch. then start your code change
Once you finished your code change, use ‘git status’ to check the status of your local repository. This will show you which files have been modified or added and which files are ready to be committed.
Use ‘git add <file>’ to stage the changes your want to commit. or You can stage all changes by using ‘git add .‘
Use ‘git commit -m “commit message” ‘ to commit changes with a message describing the changes made.
Use ‘git push‘ to upload your commits to remote repository. this command sends your local commits to remote repository and make them available to others.
a merge request should automatically created after ‘git push’ is done. this merge request will try to merge dev branch changes to master branch.
To checkout a remote branch from Visual Studio Code, you can follow these steps:
Open the Command Palette by pressing Ctrl+Shift+P (Windows, Linux) or Cmd+Shift+P (macOS).
Type Git: Checkout to... and select it from the list.
In the prompt that appears, select origin/<branch-name> from the dropdown list of remote branches.
Choose a local branch to create or overwrite, or leave it blank to create a new branch with the same name as the remote branch.
TRANSLATEand REPLACEare both SQL Server functions that can be used to replace characters in a string, but they have some key differences:
REPLACEfunction replaces all occurrences of a specific string or character with another string or character. It takes three arguments: the source string, the string or character to be replaced, and the replacement string or character. REPLACE(string_expression, string_pattern, string_replacement)
TRANSLATEfunction replaces multiple characters at once. It takes three arguments: the source string, the set of characters to be replaced, and the set of replacement characters. Each character in the first set is replaced by the corresponding character in the second set. If a character in the first set is not found in the second set, it is removed. TRANSLATE(string_expression, string_pattern, string_replacement) SELECT TRANSLATE('2*[3+4]/{7-2}', '[]{}', '()()')–out put 2*(3+4)/(7-2)
The main difference between the two is that REPLACEcan replace one or more specific characters or substrings in a string, while TRANSLATEcan replace multiple characters at once. TRANSLATEcan be useful when you need to replace multiple characters in a string at once, while REPLACEis useful when you need to replace a specific substring or character.
RANK — Returns the rank of each row within the partition of a result set. The rank of a row is one plus the number of ranks that come before the row in question.
DENSE_RANK –This function returns the rank of each row within a result set partition, with no gaps in the ranking values. The rank of a specific row is one plus the number of distinct rank values that come before that specific row.
ROW_NUMBER — Numbers the output of a result set. More specifically, returns the sequential number of a row within a partition of a result set, starting at 1 for the first row in each partition.
NTILE — Distributes the rows in an ordered partition into a specified number of groups. The groups are numbered, starting at one. For each row, NTILE returns the number of the group to which the row belongs.
Examples
The following example shows the four ranking functions used in the same query. For function-specific examples, see each ranking function.
SELECT p.FirstName, p.LastName
    ,ROW_NUMBER() OVER (ORDER BY a.PostalCode) AS "Row Number"
    ,RANK() OVER (ORDER BY a.PostalCode) AS Rank
    ,DENSE_RANK() OVER (ORDER BY a.PostalCode) AS "Dense Rank"
    ,NTILE(4) OVER (ORDER BY a.PostalCode) AS Quartile
    ,s.SalesYTD
    ,a.PostalCode
FROM Sales.SalesPerson AS s
    INNER JOIN Person.Person AS p
        ON s.BusinessEntityID = p.BusinessEntityID
    INNER JOIN Person.Address AS a
        ON a.AddressID = p.BusinessEntityID
WHERE TerritoryID IS NOT NULL AND SalesYTD <> 0;
Once stored procedures deployed to production server, there is no easy way to safely debug or reproduce or tracking issues if we haven’t had a proper error and exception handling logic.
In this article, we’ll give one of example to catch the errors and save related information to table for issue debugging.
Handling errors using TRY…CATCH
Here’s how the syntax looks like. It’s pretty simple to get the hang of. We have two blocks of code:
BEGIN TRY
     --function logic
END TRY
BEGIN CATCH
     --error handling logic
END CATCH
The code BEGIN TRY and END TRY is our function logic code that we want to monitor for an error. So, if an error would have happened inside this TRY statement, the CATCH statement will be triggered and then we need to handle those errors inside of CATCH statement . We can try to report the error, log the error, or event fix the error. But in this article, we are going to demo how to log the error, so we know can when it happened, who did it and other useful stuff. We even have access to some special data only available inside the CATCH statement:
ERROR_NUMBER – Returns the internal number of the error
ERROR_STATE – Returns the information about the source
ERROR_SEVERITY – Returns the information about anything from informational errors to errors user of DBA can fix, etc.
ERROR_LINE – Returns the line number at which an error happened on
ERROR_PROCEDURE – Returns the name of the stored procedure or function
ERROR_MESSAGE – Returns the most essential information and that is the message text of the error
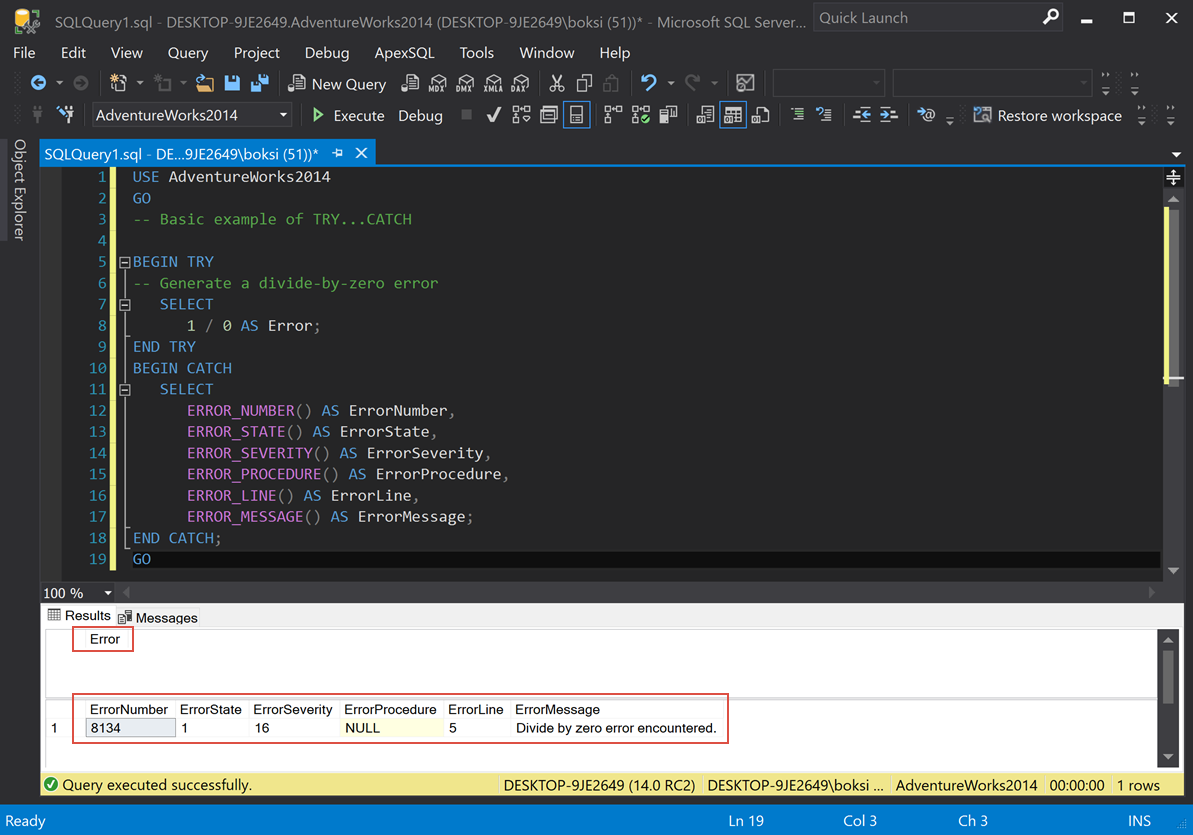
The script below is as simple as it gets:
-- Basic example of TRY...CATCH

BEGIN TRY
-- Generate a divide-by-zero error
  SELECT
    1 / 0 AS Error;
END TRY
BEGIN CATCH
  SELECT
    ERROR_NUMBER() AS ErrorNumber,
    ERROR_STATE() AS ErrorState,
    ERROR_SEVERITY() AS ErrorSeverity,
    ERROR_PROCEDURE() AS ErrorProcedure,
    ERROR_LINE() AS ErrorLine,
    ERROR_MESSAGE() AS ErrorMessage;
END CATCH;
GO
This is an example of how it looks and how it works. The only thing we’re doing in the BEGIN TRY is dividing 1 by 0, which will cause an error. If we execute the script from above, this is what we get:
From left to right, we got ErrorNumber, ErrorState, ErrorSeverity; there is no procedure in this case (NULL), ErrorLine, and ErrorMessage.
Now, let’s create a table called DB_Errors, which can be used to store tracking data:
Now, let’s modify a custom stored procedure from the database and put an error handler in there:
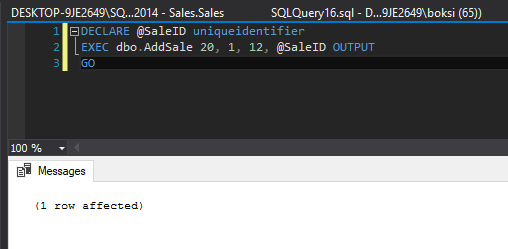
ALTER PROCEDURE dbo.AddSale @employeeid INT, @productid INT, @quantity SMALLINT, @saleid UNIQUEIDENTIFIER OUTPUT AS SET @saleid = NEWID() BEGIN TRY INSERT INTO Sales.Sales SELECT @saleid,@productid,@employeeid,@quantity END TRY BEGIN CATCH INSERT INTO dbo.DB_Errors VALUES (SUSER_SNAME(), ERROR_NUMBER(), ERROR_STATE(), ERROR_SEVERITY(), ERROR_LINE(), ERROR_PROCEDURE(), ERROR_MESSAGE(), GETDATE()); END CATCH GO
Altering this stored procedure simply wraps error handling in this case around the only statement inside the stored procedure. If we call this stored procedure and pass some valid data, here’s what happens:
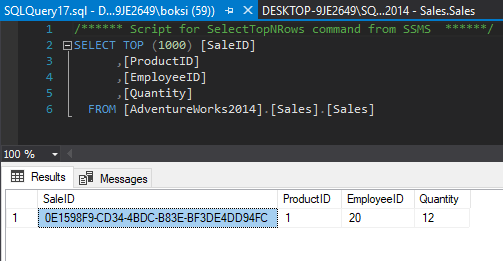
A quick Select statement indicates that the record has been successfully inserted:
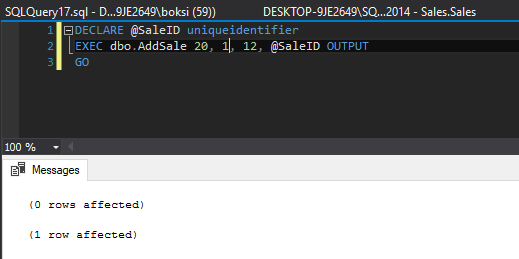
However, if we call the above-stored procedure one more time, passing the same parameters, the results grid will be populated differently:
This time, we got two indicators in the results grid:
0 rows affected – this line indicated that nothing actually went into the Sales table
1 row affected – this line indicates that something went into our newly created logging table
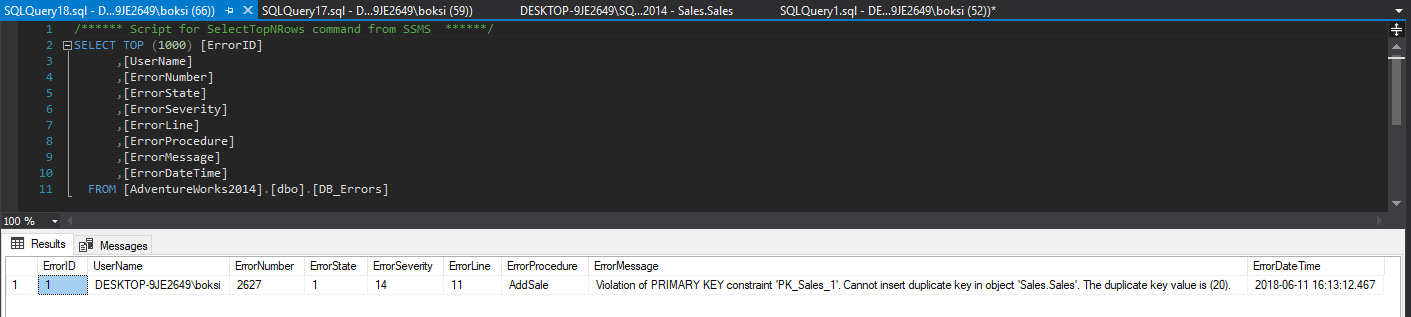
So, what we can do here is look at the errors table and see what happened. A simple Select statement will do the job:
Here we have all the information we set previously to be logged, only this time we also got the procedure field filled out and of course the SQL Server “friendly” technical message that we have a violation:
Violation of PRIMARY KEY constraint ‘PK_Sales_1′. Cannot insert duplicate key in object’ Sales.Sales’. The duplicate key value is (20).
So in this way, we have tracking what the error happened and then can fix issue based on the error information which make our issue tracking and fixing task more easily.
When we are working with SSIS, we may need to know the SSIS operation status or force stop some process.
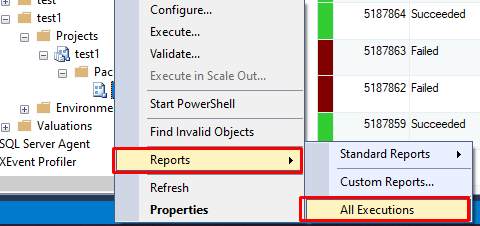
To quickly check the processing status or message from the SQL Server Management Studio, you just need to expand the Integration Services node, under SSISDB find out your package and [Right click] your package, and then click [Reports] -> [All Executions]. A new window will open with all the execution information
You can check catalog.operations and catalog.operation_messages in the SSISDB database for the detailed operation types and emssages as well.
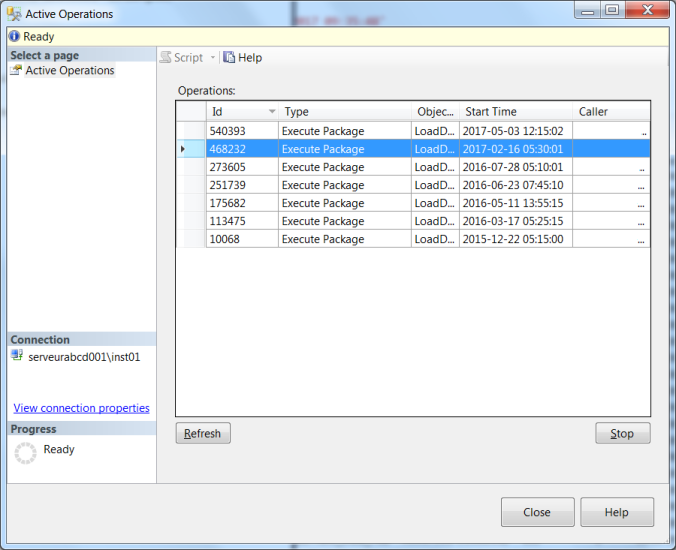
To Force Stop the execution from the SQL Server Management Studio, you just need to expand the Integration Services node, right-click SSISDB, and then click Active Operations. A new window will open with a Stop button where you can cancel a specific operation (a SSIS package that is executing)
You also can this via T-SQL by calling the stored procedure catalog.stop_operation passing the operation ID as a parameter.
In the data world, duplicated data is a very common issue. It may duplicated for few fields or even worse you have more then two identical rows in the table and there is no way to distinguish those rows. So how to clean those duplicated data?
DELETE Duplicate Records Using TOP
Since SQL Server 2005 we can use the TOP command when we issue the delete, such as the following.
CREATE TABLE dbo.duplicateTest (
	[id] [INT] NULL,
	[name] [VARCHAR](100)
)

INSERT INTO dbo.duplicateTest VALUES (1, 'a')
INSERT INTO dbo.duplicateTest VALUES (1, 'a')
INSERT INTO dbo.duplicateTest VALUES (1, 'a')
INSERT INTO dbo.duplicateTest VALUES (2, 'b')
INSERT INTO dbo.duplicateTest VALUES (3, 'c')

DECLARE @id int
WHILE EXISTS (SELECT COUNT(id) FROM dbo.duplicateTest  GROUP BY id HAVING COUNT(id) > 1 )
BEGIN
	SELECT TOP 1  @id = id
	FROM dbo.duplicateTest
	GROUP BY id
	HAVING COUNT(id) > 1

	DELETE TOP(1) FROM dbo.duplicateTest WHERE id =@id
END
So as you can see using the top in while loop we can remove multiple duplicated records even you are not sure which id is duplicated.
DELETE Duplicate Records Using CTE
another way we can use to remove duplicated records is by using CTE.
TRUNCATE TABLE dbo.duplicateTest
INSERT INTO dbo.duplicateTest VALUES(1, 'Bob')
INSERT INTO dbo.duplicateTest VALUES(2, 'Dave')
INSERT INTO dbo.duplicateTest VALUES(3, 'Karen')
INSERT INTO dbo.duplicateTest VALUES(1, 'Bob')
INSERT INTO dbo.duplicateTest VALUES(1, 'Bob')


WITH cte1
AS (
   SELECT ROW_NUMBER() OVER ( PARTITION BY ID ORDER BY ID) rank1,*
   FROM dbo.duplicateTest
)
DELETE FROM cte1 WHERE rank1 > 1
Index is used to speed-up query performance in SQL Server. It is similar to book or dictionary indexes. In the book, if you are looking for some particular chapter, you can looking the index and get the page number of the chapter then go directly to that page. Without index, it will take long time for you to find the desired chapter.
The similar logic for the database index. Well-designed indexes can reduce disk I/O operations and consume fewer system resources therefore improving query performance. In SQL Server table can have two types of indexes:
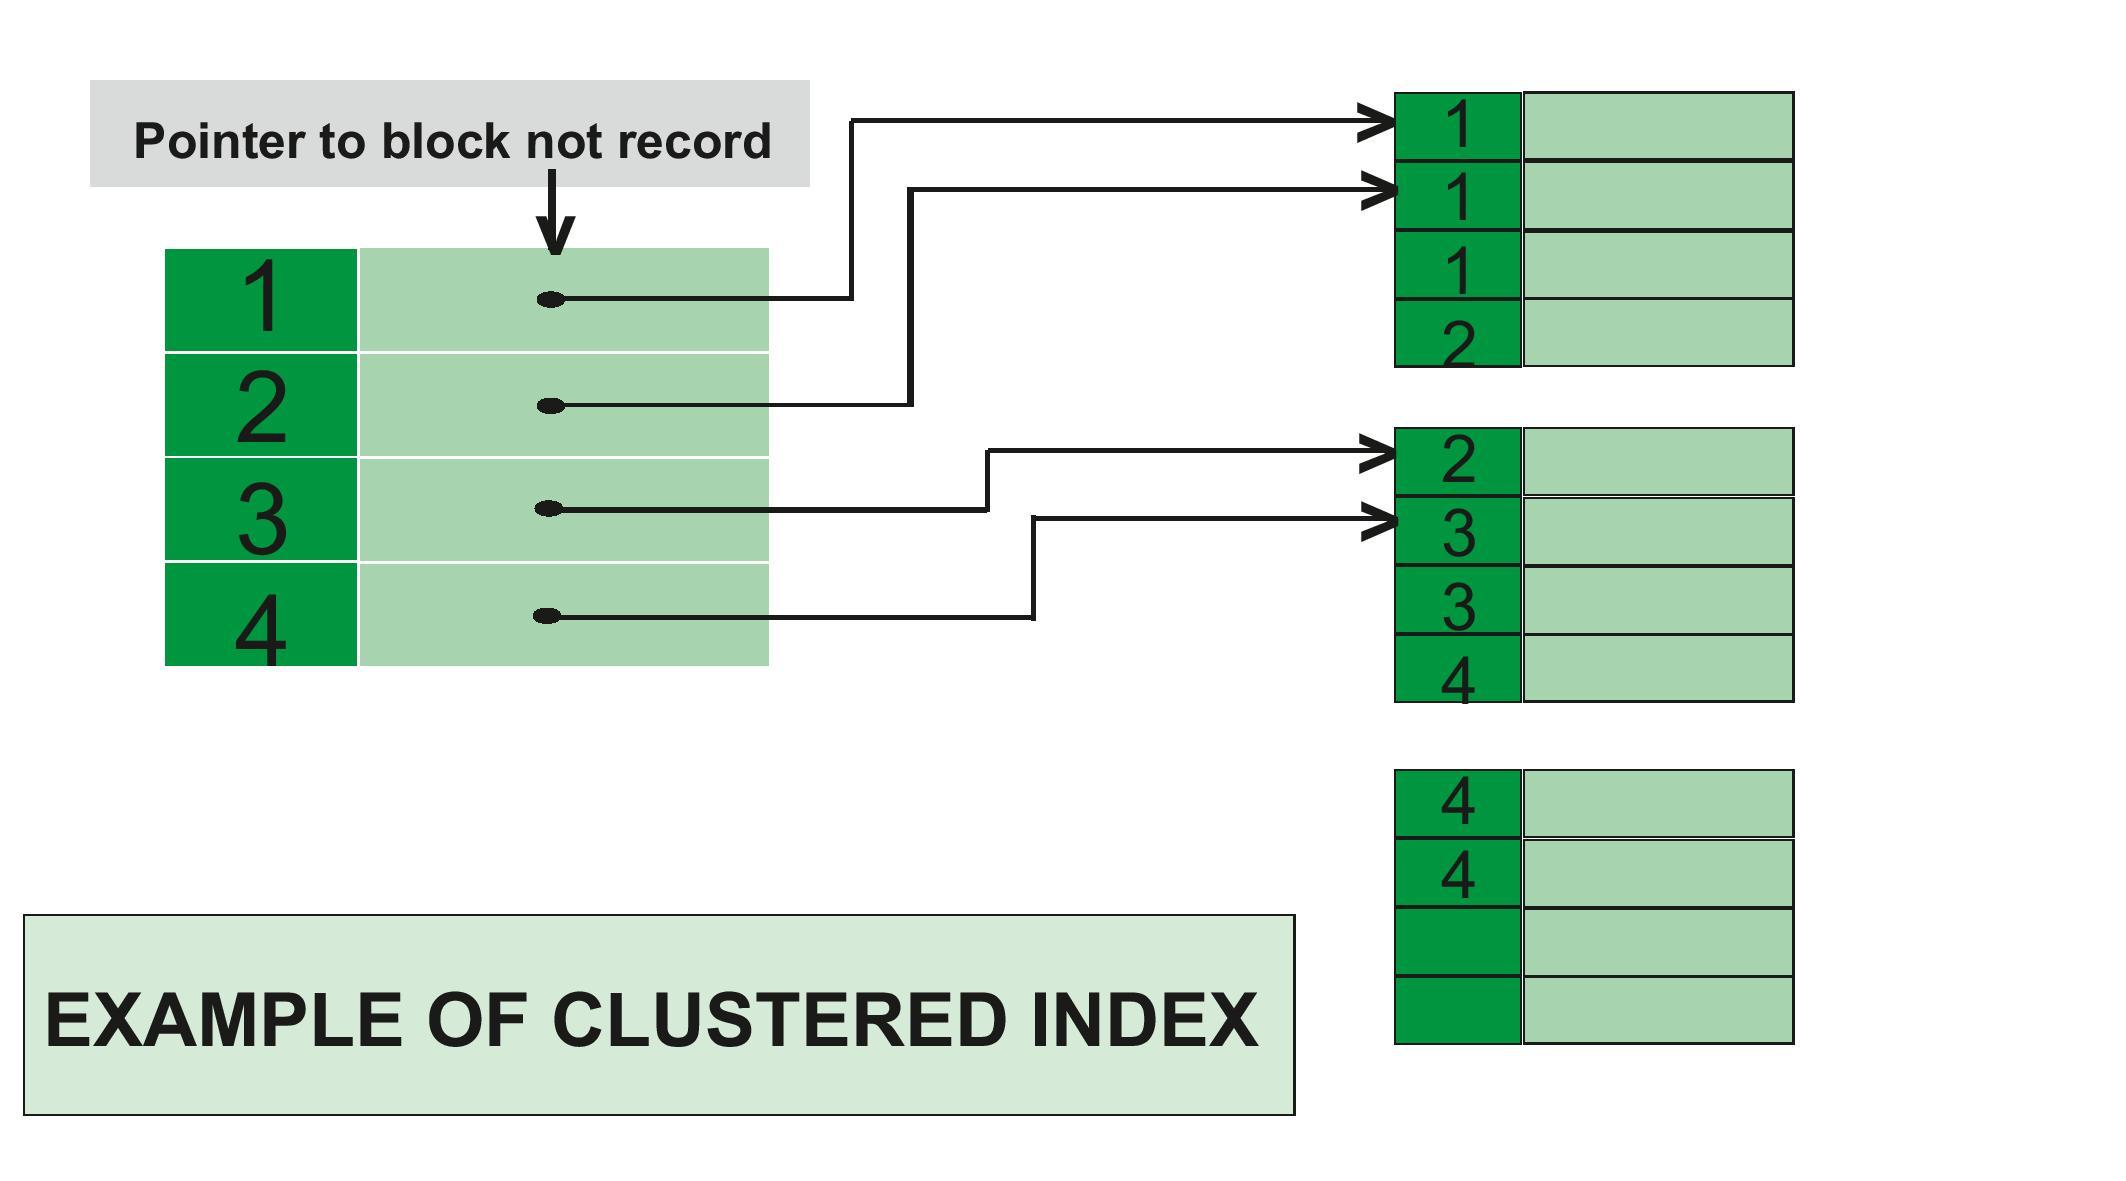
Clustered Indexes Clustered index is as same as dictionary where the data is arranged by alphabetical order. The order clustered indexes stored the table or view data rows in the table is the order of key values order. Each table can have 1 clustered indexes only, because it can have one kind of order in the same. In SQL Server, the primary key constraint automatically creates a clustered index on that particular column.
Example of clustered index
CREATE DATABASE schooldb
CREATE TABLE student
(
id INT PRIMARY KEY,
name VARCHAR(50) NOT NULL,
gender VARCHAR(50) NOT NULL,
DOB datetime NOT NULL,
total_score INT NOT NULL,
city VARCHAR(50) NOT NULL
)
The primary key of column ‘id’ will become clustered index automatically. You use system procedure “sp_helpindex” to see the indexes of the table.
USE schooldb
EXECUTE sp_helpindex student
Another way to view table indexes is by going to “Object Explorer-> Databases-> Database_Name-> Tables-> Table_Name -> Indexes”.
Non-clustered Indexes Non-Clustered Index is similar to the index of textbook. The index of textbook listed the chapter name and related page number, you can directly go to the page by using the page number of the chapter if you are looking for some particular one.
The data and index are stored in different place. Therefore you can have multiple non-clustered index for each table, all the index will point to the same storage place. To create a new clustered Index, execute the following script:
use schooldb
CREATE CLUSTERED INDEX IX_tblStudent_Gender_Score
ON student(gender ASC, total_score DESC)
Differences
differences between clustered and non-clustered indexes.
Can only have one clustered index per table. However, We can create multiple non-clustered indexes on the same table.
Clustered indexes only sort tables. Therefore, they do not consume extra storage. Non-clustered indexes are stored in a separate place from the actual table claiming more storage space.
Clustered indexes are faster than non-clustered indexes since they don’t involve any extra lookup step.
In clustered index, the clustered key defines order of data within table. In non-clustered index, the index key defines the order of data in the index only.